Sunday 18 September 2011

Toronto Squirrel Climbs Extension Ladder...Film at 11

Sorry for the extended delay in posting, we decided to go to PEI and environs for an extended holiday which meant beefing up the water system, especially at this time of the year when all the fruit/veg are so thirsty and growing like mad. So Martin, not a plumber by trade but a plumber at heart, set up a permanent watering system that doesn't involve manually dragging the hose to the roof to fill siphon buckets every few days. There is now a hose running up to the roof with a constant water feed and a toilet float in a bucket to keep the water in all the buckets at a constant level. This central bucket it linked with hosing to several other siphon buckets distributed across the roof. 


We were gone 2 1/2 weeks so  I really wasn't sure what we'd encountered we went went to the roof but we were met wit a bounty of harvest! Between Aug 22 and Sept 10 we collected 10 lbs of Roma tomatoes, many Pink Ladies, Early Girls, Red/Yellow/Ring of Fire peppers. Some of the siphons had lost their prime so a few of the tomato plants had some brown leaves, but overall no major catastrophe. The cucumbers seem to be done though and I'm not sure why since they looked good before we left (i.e. green leaves and some blossoms coming), the zucchini is doing slightly better but seems to have stalled (i.e. still has some blossoms but seems to have slowed down in terms of producing veg.)


We kept the traditional garden going with an automatic timer on a sprinkler and our neighbours were kind enough to continue harvesting cherry tomatoes which are the stalwarts of that garden, they seem to thrive in poor conditions (i.e. low light, little attention).

The weak part of the rooftop system is the siphons which seem to lose their prime occasionally. Next year we will come up with a system that doesn't rely on a siphon but the plumber has some investigation to do to come up with a cost effective solution. There'll be endless evenings trawling the internet during the cold Toronto winter looking for solutions not doubt!

Last Sunday, my niece Nat come over and helped make Hot Tomato Chutney with the Roma tomatoes we harvested. It's an excellent chutney, great on burgers, in a cheese sandwich or served with pork. See recipe at the end of this post, courtesy of Jayne from England who introduced me to this great chutney.

And yes, Martin did see a squirrel, jump from the bicycle shed roof, onto the extension ladder and proceed to climb the rungs of the ladder. Who'd thunk it!


Hot Red Tomato, Pepper and Chilli Chutney

Ingredients:
3 kg red tomatoes, firm
5 to 7 large peppers (1.4 kg)
1 kg onions
100g fresh root ginger, grated
or, 1 to 2 ds ground ginger
228g (8oz) dark Muscovado sugar (I just used light brown sugar)
500 ml red wine vinegar
2 tubes tomato puree (double concentrated 200g)
1 ds Halen Môn Anglesey Sea Salt (or what ever kind you have on hand)
1 ts allspice
0.5 ds cumin seeds
1 ds coriander seeds
2 ds mustard seeds
12 whole cardamom pods
12 Hot Mexican red chillies
7 large garlic cloves

ds = dessert spoon ts = tea spoon
Preparation:

Cut up the tomatoes into medium sized pieces (2-3 cm) and place in a large preserving pan. Cut the peppers lengthways in half; remove the pith and seeds before slicing into medium sized pieces, add to the pan. Peel and roughly chop the onions, add to the mixture. Add the sugar and grate the ginger on to the mixture in the pan. Peel the garlic and cut-up into small pieces, or crush the garlic if preferred and add to the mixture.
Squeeze the 2 tubes of tomato puree on to the mixture. Select 12 red chillies and carefully slice, or chop them into small pieces before adding them to the mixture.
Dry-roast the cumin, coriander, mustard, cardamom pods and seeds in a small frying pan for 2-3 minutes. Immediately grind in a pestle and mortar and add all of it (including any husks and pods) to the mixture.
Pour the vinegar over the mixture.
Cooking:
Put on the heat and bring to the boil stirring frequently. The gentle simmer for about 2 hours with the pan lid in place. Stir from time to time. Then remove the lid and allow the liquid to almost evaporate continuing to stir from time to time. When the chutney is thick enough turn off the heat and allow cooling for 5-10 minutes before bottling-up in preheated jars (put in the oven at 120C on a metal tray for 20 minutes). Seal the jars when still hot and store for 6-8 weeks to mature, but it can be consumed in a day or two if you can't wait!. Makes 3 - 4 litres of chutney (10 - 12 jars of 330 ml capacity).

Tuesday 9 August 2011

Fresh

Ring of fire peppers, cucumbers and roma tomatoes

So fresh you can still see the moisture from the rain on the tomatoes. How great is that?!

Tuesday 2 August 2011

Blossom end rot, you know you want it...

I fertilized everything again last Friday since it was ~ two weeks since the last treatment. Harvested more zucchini (a.k.a courgette) which is producing a nice little crop, I'm always amazed at how quickly they grow, easily several inches in a couple of days. The cucumbers are still struggling a bit, maybe still trying to recover from insufficient water in early July but there are several blooms so I'm not giving up yet.

I started with 4 roma tomatoes plants and lost one early on due to not staking it. Now 1 of the remaining 3 has blossom end rot as you can see from the slightly blurry photo below.


See the dark bottom on the tomato
I'm quite sure this happened when we were away for 11 days and the plant got too dry. I've had it happen before to tomatoes planted in the ground. In any event, it will mean I need to cut off the very bottom of those tomatoes before using them. The romas are earmarked for tomato chutney so it's not a major crisis.

Romas ladden with fruit, the right one has
bottom blight

Third roma with ripening fruit


Shy pink lady hiding in the foliage
Otherwise, things are coming along well, the pink lady which was planted the latest has lots of fruit on it and has one beautiful reddish pink tomato that I will pick in the next few days. I've never tried this variety before so am quite keen to see how they taste.


All of the early girls are doing fine, good foliage, lots of fruit coming albeit at the moment I would say that the topsy turvy and traditional garden ones have the most foliage but the rooftop ones seem to have the most fruit (at the moment). Given that only the early girls are in all three places, I will try to track yield on each plant when they start ripening.

Thursday 14 July 2011

11 Days without TLC

Don't forget, you can now follow me via email, don't be shy to sign up. I have no interest whatsoever in mining your data and selling my list to some marketing (tele or spam) company.

So we went to Hawaii for 11 days.  According to my niece Nat who held down the fort while we were away, it was very hot and humid the entire time and there was no rain. So it was with some trepidation that I climbed the ladder to the roof on Tuesday to see how everything had faired during that time without any TLC (no I didn't think it was fair to ask someone else to climb to the roof).

So I definitely had to take some remedial action but had some fun spraying the neighbour's kids with the hose from our roof (shout out to Hayden and Ruby for being such good sports) while I was up there!

The buckets (both the plant containers and the siphon buckets) were either entirely or nearly dried out. One more day and I think I might have lost some plants for good. The cucumber that was ailing when I left in now fine, and the one that was in good shape when I left is now ailing! That said, it is no worse than the other one was in early July so I am hoping it bounces back. There are loads of zucchini coming soon, leaves a bit dried out but not too bad. The roma & early girl tomatoes are looking a bit dry but with loads of fruit coming on the romas.  The other things that are in earlier stages of maturity ( and therefore I assume consuming less water) such as the pink lady tomato and all the peppers are looking very leafy, green and healthy.

I hope that with some more constant TLC and water I can get those that are ailing back on track. 

Foreground cucumber is now fine and other one
(right) is ailing 
Cucumber coming on the healthier of the two. Yum!


The zucchini is looking fine
Pink Lady doing well ( a few blossoms)


Roma laden with fruit


Friday 1 July 2011

and the zucchini goes to...

My neighbour Martine for being the first to leave a comment on my blog! Congrats and let me know how it tasted.


Good thing I went up to harvest the zucchini because I found that the water level was very low in the buckets. I had filled them on Sunday but not enough. I had to do CPR on one of the cucumber plants which was very wilted.

The second cucumber was a bit wilted but not too badly.

See very badly wilted cucumber in the foreground with second not so wilted just to the left. 

Tying the siphon tubes to the bucket using tie wraps was Martin's idea and should keep the tubes in place better to keep the siphons working and avoid future problems (I hope). I have also doubled up on the siphon buckets, to provide more water overall. Whereas previously I had one siphon bucket per 4 plants I now have two for 4 plants.


First cucumber is coming on the healthier of the two plants

Monday 27 June 2011

Eagerly anticipating cucumbers

I mentioned in my last blog that I had lots of cucumbers coming and I needed to have a way to support them so they weren't sitting on a hot roof turning to mush. My better half and I went to the roof yesterday to build a simple lightweight support structure made of bamboo and plastic netting. Hope it works!


I also noticed that the siphon buckets were getting a bit slimy, no algae but I elected to drain, rinse and refill the buckets.

Lastly, I expect to harvest my first zucchini before the end of the week!

Saturday 25 June 2011

After several days of quite heavy rain...


I'm pleased to say that all is doing very well up on the roof.

First, my new algae prevention system is working well and the plastic garbage bags secured with the rubber gasket from spare lids is allowing rain water to pool on top and drain slowly through the small hole poked in the bag. The siphon buckets are fuller than when I topped them up last weekend.


Second, everything from the tomatoes to zucchini and cucumbers have grown larger, produced more blossoms and in the case of the latter two, have lots of veg coming.

First zucchini!


Cucumbers with loads of blossoms and several little cucumbers.
Lastly, the tomatoes are all doing well. All are in bloom other than the one that is planted in the ground. The one planted in the topsy turvy and those in the roof top containers are all blooming including the Pink Lady which I just planted last weekend to replace the broken Roma. I fertilized all those in bloom with a 4-6-8 fertilzer. 

Romas doing very well

Pink lady tomato planted last weekend is already in bloom


Early Girls in Bloom

The topsy turvy early girl is also in bloom


Traditional early girl is growing well but not in bloom yet

My next step is to come up with a plan for supporting the cucumbers and zucchini to keep them suspended so they don't rest on the hot roof. I have a few ideas but need to sleep on it...

Sunday 19 June 2011

One down, due to my own incompetence

I lost one Roma tomato plant because, although I had put a bamboo pole in for support, I had failed to tie the plant to the pole. The otherwise very healthy plant snapped so I now have three romas rather than four. I replaced the broken plant with a Pink Lady (tomato) which I've never tried before. Otherwise things are looking great up on the roof. My cucumbers and zucchini have blossoms so I fertilized them with a 4-6-8 fertilzer which I hope will be good for all the demands the rooftop containers.
Zucchini going great guns

Cucumber and blossom

I also had to find a better way to secure the garbage bags to the siphon container as some had come lose. I used the rubber gasket from 3 spare lids and put them around the containers. I think this will work better than merely tucking them under the container itself since the wind had blown the bags off. The bags (per early blog) are used to block the light and hope fully stop algae from developing in the siphon container.

I now have a good arrangement for the tomato being grown in the topsy-turvey. The plan is to compare the yield between the rooftop containers, the topsy-turvy and the traditional garden tomatoes. As such, I'm using the same type (Early Girl) but three different growing scenarios.

The container tomatoes are growing well


Topsy turvy also doing well
Traditional (directly in the garden) is growing more slowly


Wednesday 8 June 2011

34C

Wow and it's only June. I, of course, went up to the roof during the hottest part of the day to change the siphon buckets (to get rid of the Algae). I used a dark garbage bag over each bucket (and tucked underneath) which I hope will cut off enough light to stop the algae. I poked a small hole in the middle of the bag to allow rain water to drain in. We'll see how it works!

Otherwise things look good. The water level is good in all the buckets and the soil moisture is good. The tomatoes are looking robust!

Sunday 5 June 2011

Algae!

It took till this weekend to get the ladder back up. I went up today and found that the siphon buckets are filled with algae. I plan to dump, clean and refill them and cover them to cut off the light source  (in this case the sun) which I understand is required for algae growth. I'm not sure that algae in the water source would do any harm other than eventually building up on the siphon tubes and clogging them but in any event I will try to get rid of the algae.

Otherwise, everything is fine so  actually made 4 more buckets this weekend and planted 4 Roma Tomatoes. Some of the plants are showing a little transplant shock ( a bit of yellowing on some of the leaves, mostly the cucumbers). I've been measuring the moisture in the buckets, soil seems reasonably moist and the level of water in the siphon buckets hasn't changed much. I actually haven't had to water the plants since May 22. We've had quite warm weather, between 20-30 C but we've also had some rain which will keep the buckets topped up.

Wednesday 1 June 2011

Big Winds, Down comes the Ladder

With the heavy winds today Wednesday the ladder blew down, fortunately no damage but I need to come up with a way to secure the ladder so it doesn't happen again.

Saturday 28 May 2011

Design and Build of the Self-Watering Containers

First I needed to find a source of inexpensive, preferably free, food-grade plastic buckets. Our local grocery store bakery department was a great source of free containers and they very kindly set them aside for me them for me for a few weeks (normally they throw them out). Knowing that I had a free source of these buckets confirmed that I would proceed with the two bucket design. Next I found tubing for the fill tube and a smaller size tubing to be used for the siphon between the plant containers and the containers with extra siphon water. The yogurt containers used to help wick water from the reservoir were free (from my kitchen). Lastly, I went to the Green Living Show in Toronto this year (it was great!) and had a discussion at the Sheridan Nursery booth with a Steve Biggs, a horticulturist and co-author of No Guff Vegetable Gardening (which I bought) who gave me great tips such as using a commercial grade of peat-based soilless mix. I should note that I am very inexperienced at container gardening so his advice was much appreciated. I chose to use ProMix BX which I found at my local garden centre.

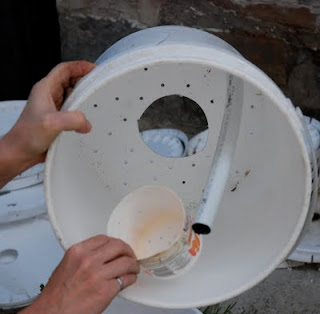
A picture is worth a thousand words. Rather than describing the container design see the pictures below that illustrate the two nested containers and the yogurt container that acts as the wick from the water receptacle to inner bucket. Note that there are two overflow holes drilled through each of the nested containers. This is to allow run-off of excess water when we have the inevitable torrential Toronto thunderstorms. These also came in handy when lifting the buckets to the roof (more on this later).


This is the inner bucket with multiple small drainage holes, medium hole for the fill tube and large hole for the yogurt container to be inserted.
Inner bucket with the fill tube inserted and the yogurt container (also with  drill holes to create the wicking action).

Inner bucket with yogurt container inserted.


Top view showing the assembled containers. Note that the nails you can see are temporary. They mate the inner and out buckets together to make it easier to haul them up to the roof without having them separate. The nails are installed in the overflow holes which are drilled through the inner and outer buckets

With the lid on. Note that I modified the lid later on by cutting in half so that I could lift the lid without damaging the plants. 

I enlisted the help of my niece, Nat, to help me build the containers. We got an assembly line going and used a drill and a jig saw to drill and cut the holes as well as to split the lids in two. We made eight containers, which took about 1.5 hours to do with two of us working on it. We then added the soilless mixture to each container, transplanted the plants, added 2 Tablespoons of bone-meal to each container, put the lid on and put nails through the overflow holes to temporarily mate the containers together so that they could be lifted onto the roof using the handle from the inner bucket.

Assembled container with soilless mixture but no water. The container was still very light at this point so easy to lift manually to the roof.

Note that the lid is split now. I was concerned that I might have to remove the lid to fertilize, or if the containers over heated or there was too much moisture (and therefore mildew). This I hope has the advantage of helping to retin moisture but allowing the lid to be removed if necessary.


We did all the assembly at ground level other than adding the water, which minimized the weight of the containers. The containers were so light, I was able to pull them up manually by attaching a rope to the container handle and pulling the rope hand-over-hand up to the roof. I also pulled the hose up to the roof added water to the containers, filled the water receptacle via the fill tube. I then added water to the siphon container and created the siphon between the self-watering container and the siphon container (see this video on creating an automatic watering system using siphon http://www.globalbuckets.org/) . My hope is with this system, that I might only have to replenish the water once a week, depending on rain, heat etc.


Finally, we get up to the roof! Along with hauling up the containers manually I hauled up the hose and watered from the top to wet the soilless mixture filling till some water came out the overflow holes so that I was sure that the water reservoir was full.

I then added water to the siphon container. I inserted the tube into the plant container fill tube first and then created the siphon effect and inserted the other end of the tube into the siphon container. At the moment, I have duct taped the siphon tubes to the container but I may need to modify this with twist ties.


Since planting on May 22, we’ve had hail and heavy rain. I’ve been up to the roof to check on things and everything is still fine. 

Researching Self-Watering Containers

Over the winter I found several helpful sites with information on self-watering containers. I was particularly impressed with this one http://www.globalbuckets.org/ and was inspired by the two young brothers who created the organization. They had a design based on two buckets that is the basis of my container design. I had seen variations on this design using a single bucket and LECA with horticultural fabric but decided to go with a design that would maximize the water reservoir space thereby minimizing the number of trips up to the roof merely to top up the water; as I mentioned in my previous blog entry I have to access the roof via and extension ladder. I also have decided to implement a siphon system to further reduce trips to the roof. 

If this project is a success, we may invest in a more permanent solution for accessing the roof top garden.

Friday 27 May 2011

Why am I climbing the walls?


To get to the roof, of course! Last year I had a disappointing tomato crop. Given that we have a fairly small city lot, there are limited options for locating the vegetable garden to maximize sun, which is one essential for getting a good tomato crop. Pondering my problem, I came up with the idea that our flat roof (the back 2/3 of the roof on our semi-detached home is flat) would be a great sunny space. I wanted to try it out this year and didn't want to invest too much into the project.  I also didn’t want to have to climb up on the roof too often because I have to access it via an extension ladder so I started to research self-water containers.

Follow me up to the roof...