First I needed to find a source of inexpensive, preferably free, food-grade plastic buckets. Our local grocery store bakery department was a great source of free containers and they very kindly set them aside for me them for me for a few weeks (normally they throw them out). Knowing that I had a free source of these buckets confirmed that I would proceed with the two bucket design. Next I found tubing for the fill tube and a smaller size tubing to be used for the siphon between the plant containers and the containers with extra siphon water. The yogurt containers used to help wick water from the reservoir were free (from my kitchen). Lastly, I went to the Green Living Show in Toronto this year (it was great!) and had a discussion at the Sheridan Nursery booth with a Steve Biggs, a horticulturist and co-author of No Guff Vegetable Gardening (which I bought) who gave me great tips such as using a commercial grade of peat-based soilless mix. I should note that I am very inexperienced at container gardening so his advice was much appreciated. I chose to use ProMix BX which I found at my local garden centre.
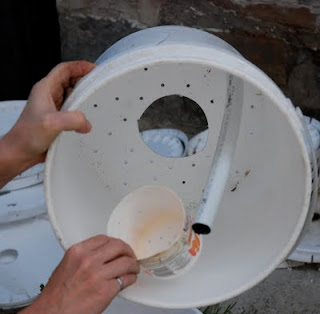
A picture is worth a thousand words. Rather than describing the container design see the pictures below that illustrate the two nested containers and the yogurt container that acts as the wick from the water receptacle to inner bucket. Note that there are two overflow holes drilled through each of the nested containers. This is to allow run-off of excess water when we have the inevitable torrential Toronto thunderstorms. These also came in handy when lifting the buckets to the roof (more on this later).
 |
| This is the inner bucket with multiple small drainage holes, medium hole for the fill tube and large hole for the yogurt container to be inserted. |
 |
| Inner bucket with the fill tube inserted and the yogurt container (also with drill holes to create the wicking action). |
 |
| Inner bucket with yogurt container inserted. |
 |
| With the lid on. Note that I modified the lid later on by cutting in half so that I could lift the lid without damaging the plants. |
I enlisted the help of my niece, Nat, to help me build the containers. We got an assembly line going and used a drill and a jig saw to drill and cut the holes as well as to split the lids in two. We made eight containers, which took about 1.5 hours to do with two of us working on it. We then added the soilless mixture to each container, transplanted the plants, added 2 Tablespoons of bone-meal to each container, put the lid on and put nails through the overflow holes to temporarily mate the containers together so that they could be lifted onto the roof using the handle from the inner bucket.
 |
| Assembled container with soilless mixture but no water. The container was still very light at this point so easy to lift manually to the roof. |
We did all the assembly at ground level other than adding the water, which minimized the weight of the containers. The containers were so light, I was able to pull them up manually by attaching a rope to the container handle and pulling the rope hand-over-hand up to the roof. I also pulled the hose up to the roof added water to the containers, filled the water receptacle via the fill tube. I then added water to the siphon container and created the siphon between the self-watering container and the siphon container (see this video on creating an automatic watering system using siphon http://www.globalbuckets.org/) . My hope is with this system, that I might only have to replenish the water once a week, depending on rain, heat etc.
Since planting on May 22, we’ve had hail and heavy rain. I’ve been up to the roof to check on things and everything is still fine.


