Showing posts with label siphon. Show all posts

Wednesday, 6 June 2012

The new irrigation system

At the end of July 2011 we added to the irrigation system to make it easier to get water up to the roof. I had been hauling the hose up there approximately every 4 days. We put a y-connector to our existing hose and put a run of hose up to a bucket with a valve. The valve is a toilet float modified by Martin for use on the roof.
Float Bucket


From this bucket we then distributed to a couple of centralized buckets from which we connected the siphon tubes to the grow buckets. We had some problems with the siphons losing their prime though and this resulted in dry buckets a couple of times when we were gone for an extended period (more than 1 week). So this year we added a permanent irrigation system instead of siphons. This should have two benefits, 1) I won't have to go up to the top as often merely to fill water buckets and check the siphons and 2) if we're away for more than a week, we can be sure that the buckets won't go dry due to siphon failure as a couple did last year.

This entailed adding thru-hulls to each grow bucket so they could be connected to irrigation hoses that connect to to float bucket which sets the overall level of the water across all buckets.

Thru-hull
Buckets connected to irrigation system

In addition, we added styrofoam under the buckets to protect the roof surface and to facilitate leveling. The buckets closer to the edge of the roof are on 2" styrofoam while those farther from the edge are on 1/2", given the slant of the roof, this works out just right.


So this is the practical plumbing stuff that I hope will lead to another year of delicious vegetables.

Thanks to Martin for his superb plumbing skills and patience ;-). And both Martin and my niece Nat who were most helpful in drilling, cutting, filling, planting and hauling buckets. You will both benefit from the end results!

Most of the planting happened last weekend (May 26th) with the exception of the San Marzano's which I started from seed and I thought I'd give them a little more time to acclimatize to full spectrum sunlight.

San Marzano (and other) Seedlings

Sunday, 3 June 2012

2011 Summary

Before moving on to what's new for 2012, I wanted to summarize how things went in 2011. The rooftop provides more sun and heat so the rooftop was a big success and produced better results than the traditional (in the ground) garden with the exception of cherry tomatoes which do fine in the ground. That said, because my access is via an extension ladder, a moderate investment to improve the irrigation system this year was in order. 

The is no question that the rooftop is a great place to grow vegetable and that it resulted in much more produce than the traditional garden- easily 50% more. I had planted two tomatoes in the traditional garden, one in the topsy-turvey one in the ground. Neither did particularly well because of the low light conditions  and produced a handful of tomatoes - rather sad really. However, the cherry tomatoes do absolutely fine trained up the fence so I will continue to do them in the ground. My assumption is that the bigger the tomato, pepper or what have you, the more light energy is required. The other interesting fact is that the rooftop tomato vines didn't get as tall - they seemed to put more energy into producing fruit than leaves. Two possible reason for this might be a) due to the higher light conditions, less vine is required to capture the necessary energy and/or b) the plant size was constrained by the bucket size. I'm no botanist so am only guessing at the root cause ;-).

Also, this year I am dropping one tomato variety from the roster. The "pink lady" although very pretty and popular with some of the neighbourhood kids was very bland in my view and I'm the boss-of-the-rooftop so it's gone! I'm also not growing ring-of-fire peppers, while fantastic and very hot, we still have so many in the freezer that we won't need anymore hot pepper for a couple of years.

One other plant/container related adjustment. The peppers, while very tasty and quite productive, were strangely shaped - sort of squat. I'm only guessing that they need larger containers for more root space. My free, food grade containers (thanks Loblaw's bakery) only come in one size so I have doubled them up this year and cut the bottom out of the inner one to give an extra 4" of root space. We'll see how it works...again another experiment.

Last year was our first year so we did things as simply and inexpensively as possible since it was an experiment. The self-watering containers were great, the water reservoir cut down on trip to the roof kudos again to the two young brothers at Global Buckets for an excellent web-site and their hard work on a great cause! The siphon mechanism between the self-watering container and the extra water buckets were problematic. I don't know why, but from time to time a siphon would lose it's prime and therefore its source of extra water. It may be because the clear siphon tubes were somewhat porous and prone to evaporation. This was a problem if we were away for 10 days and resulted in bottom end rot on one tomato plant. This is the main reason for the new and improved irrigation system for 2012 (more on this later).

Martin and I planned the new irrigation system and completed it before I found this link for a Rooftop Garden In Montreal but it's so great I wanted to share it with you anyway.

I'm excited about another year up on the roof and if you see me waving at you from up there, remember it could be because the ladder is gone with the wind!

Saturday, 28 May 2011

Design and Build of the Self-Watering Containers

First I needed to find a source of inexpensive, preferably free, food-grade plastic buckets. Our local grocery store bakery department was a great source of free containers and they very kindly set them aside for me them for me for a few weeks (normally they throw them out). Knowing that I had a free source of these buckets confirmed that I would proceed with the two bucket design. Next I found tubing for the fill tube and a smaller size tubing to be used for the siphon between the plant containers and the containers with extra siphon water. The yogurt containers used to help wick water from the reservoir were free (from my kitchen). Lastly, I went to the Green Living Show in Toronto this year (it was great!) and had a discussion at the Sheridan Nursery booth with a Steve Biggs, a horticulturist and co-author of No Guff Vegetable Gardening (which I bought) who gave me great tips such as using a commercial grade of peat-based soilless mix. I should note that I am very inexperienced at container gardening so his advice was much appreciated. I chose to use ProMix BX which I found at my local garden centre.

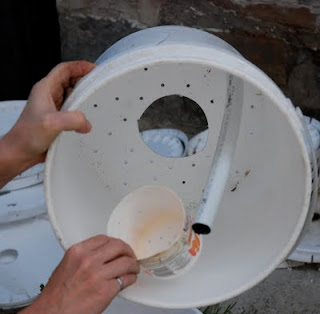
A picture is worth a thousand words. Rather than describing the container design see the pictures below that illustrate the two nested containers and the yogurt container that acts as the wick from the water receptacle to inner bucket. Note that there are two overflow holes drilled through each of the nested containers. This is to allow run-off of excess water when we have the inevitable torrential Toronto thunderstorms. These also came in handy when lifting the buckets to the roof (more on this later).


This is the inner bucket with multiple small drainage holes, medium hole for the fill tube and large hole for the yogurt container to be inserted.
Inner bucket with the fill tube inserted and the yogurt container (also with  drill holes to create the wicking action).

Inner bucket with yogurt container inserted.


Top view showing the assembled containers. Note that the nails you can see are temporary. They mate the inner and out buckets together to make it easier to haul them up to the roof without having them separate. The nails are installed in the overflow holes which are drilled through the inner and outer buckets

With the lid on. Note that I modified the lid later on by cutting in half so that I could lift the lid without damaging the plants. 

I enlisted the help of my niece, Nat, to help me build the containers. We got an assembly line going and used a drill and a jig saw to drill and cut the holes as well as to split the lids in two. We made eight containers, which took about 1.5 hours to do with two of us working on it. We then added the soilless mixture to each container, transplanted the plants, added 2 Tablespoons of bone-meal to each container, put the lid on and put nails through the overflow holes to temporarily mate the containers together so that they could be lifted onto the roof using the handle from the inner bucket.

Assembled container with soilless mixture but no water. The container was still very light at this point so easy to lift manually to the roof.

Note that the lid is split now. I was concerned that I might have to remove the lid to fertilize, or if the containers over heated or there was too much moisture (and therefore mildew). This I hope has the advantage of helping to retin moisture but allowing the lid to be removed if necessary.


We did all the assembly at ground level other than adding the water, which minimized the weight of the containers. The containers were so light, I was able to pull them up manually by attaching a rope to the container handle and pulling the rope hand-over-hand up to the roof. I also pulled the hose up to the roof added water to the containers, filled the water receptacle via the fill tube. I then added water to the siphon container and created the siphon between the self-watering container and the siphon container (see this video on creating an automatic watering system using siphon http://www.globalbuckets.org/) . My hope is with this system, that I might only have to replenish the water once a week, depending on rain, heat etc.


Finally, we get up to the roof! Along with hauling up the containers manually I hauled up the hose and watered from the top to wet the soilless mixture filling till some water came out the overflow holes so that I was sure that the water reservoir was full.

I then added water to the siphon container. I inserted the tube into the plant container fill tube first and then created the siphon effect and inserted the other end of the tube into the siphon container. At the moment, I have duct taped the siphon tubes to the container but I may need to modify this with twist ties.


Since planting on May 22, we’ve had hail and heavy rain. I’ve been up to the roof to check on things and everything is still fine.